
20 Decadent Cake Recipes and Cake Decorating Ideas
Introduction
Few things in the world of baking inspire as much awe, ambition, and pure creative joy as a truly spectacular decorated cake. Whether it is a towering celebration layer cake swathed in cloud-soft buttercream and crowned with fresh flowers, a sleek mirror glaze creation that reflects the room like liquid glass, a rustic naked cake draped in seasonal fruit, or an intricately fondant-sculpted masterpiece that looks more like art than food — a beautifully made cake is one of the most powerful expressions of skill, care, and creativity in the entire culinary world.
Cake decorating has undergone a renaissance in recent years. What was once considered the exclusive domain of professional pastry chefs and specialist bakeries has become one of the most vibrant, accessible, and inspiring areas of home baking — driven by extraordinary online communities, widely available specialist tools and ingredients, and a generation of home bakers who have discovered that with the right techniques, the right recipes, and the right guidance, truly stunning results are entirely achievable at home.
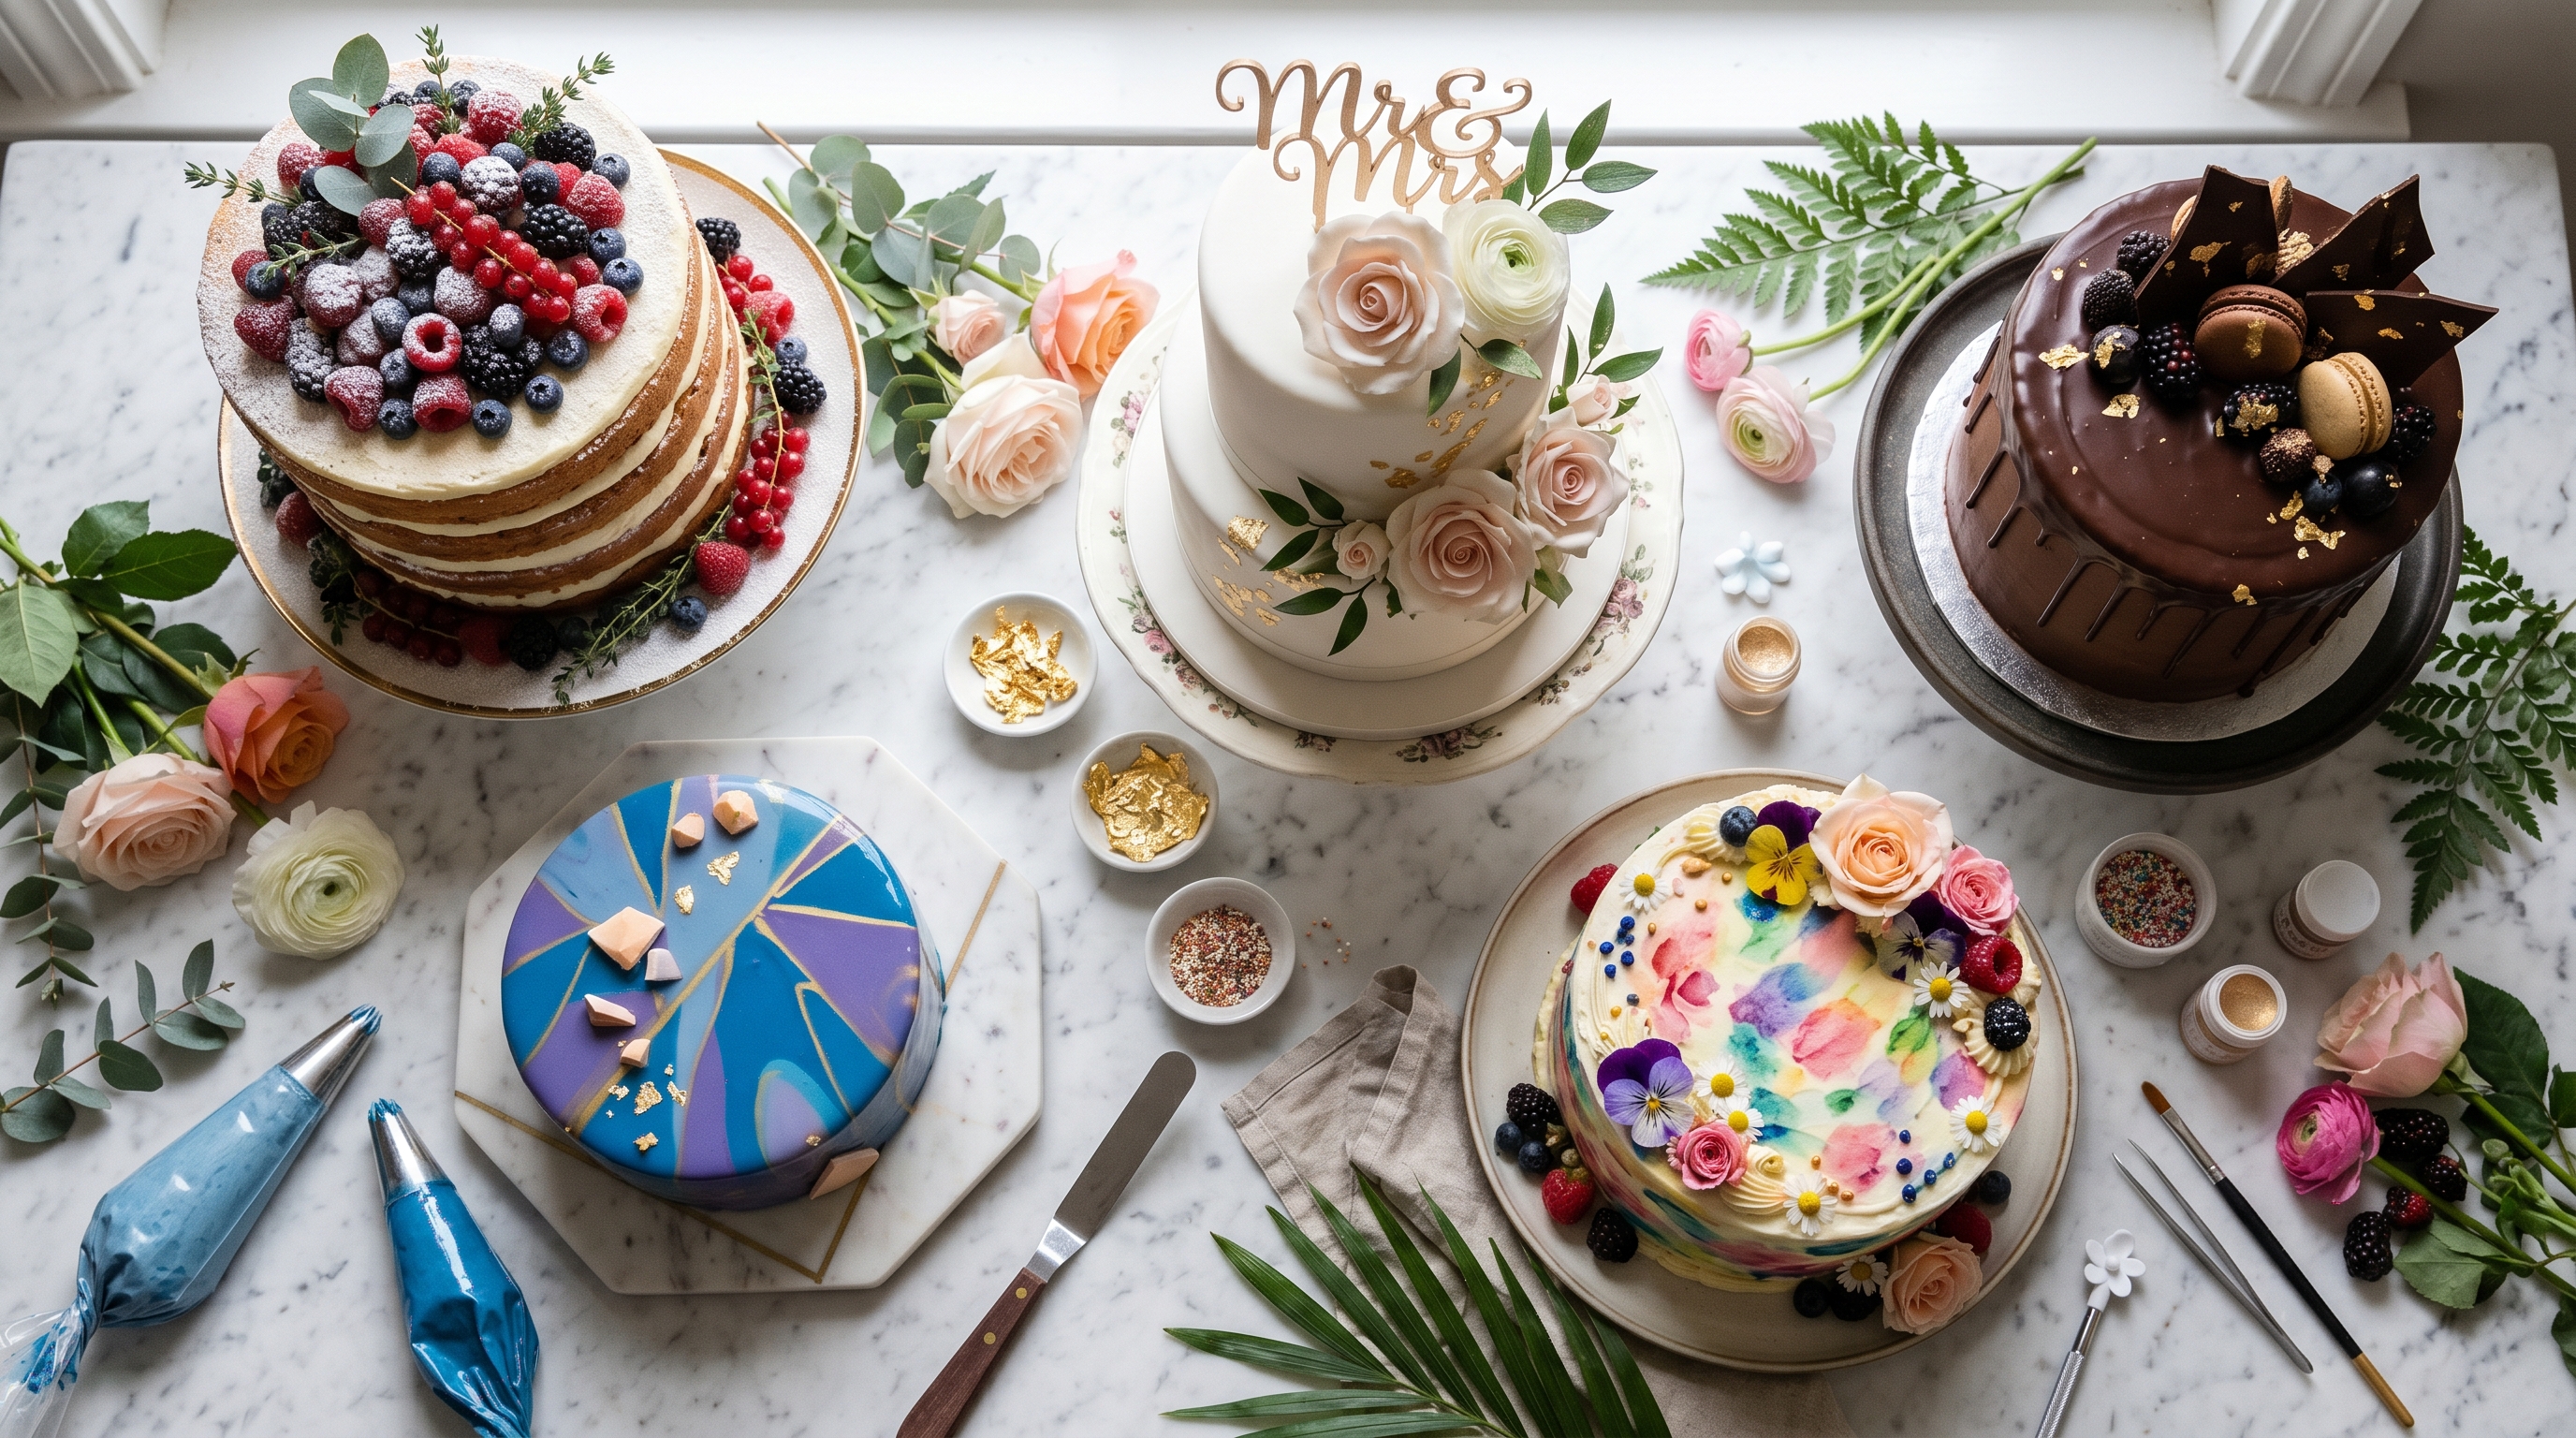
In this guide, we have compiled 20 of the most decadent cake recipes and cake decorating ideas imaginable — spanning classic flavors reinvented with modern decorating techniques, elegant floral designs, bold contemporary trends, showstopping celebration cakes, and creative concepts for every skill level and occasion. Each entry includes the cake recipe, frosting guidance, decorating technique, key tools, and pro tips so you can approach every cake with confidence and creativity.
Whether you are baking your very first celebration cake or looking to push your decorating skills to new heights, this guide is your complete inspiration and instruction resource.
Let’s bake something extraordinary.
The Foundation: What Every Great Decorated Cake Needs
Before diving into specific recipes and decorating ideas, understanding the principles that underpin every successful decorated cake will save you frustration and dramatically improve your results.
The Importance of a Level Cake
A decorated cake can only be as beautiful as its structural foundation. Domed, uneven layers create a wobbly, unstable cake that is far more difficult to frost smoothly and decorate cleanly. Always level your cake layers — either by using a cake leveler or a long serrated knife guided by eye — before assembling. This single step makes every subsequent step easier and the finished result more professional.
Crumb Coating: The Essential First Frosting Layer
A crumb coat is a thin layer of frosting applied over the assembled cake layers and chilled before the final frosting is applied. It traps all the loose crumbs from the cake surface in this initial layer, ensuring that the final frosting goes on cleanly and crumb-free. Never skip the crumb coat on any cake you intend to decorate — it is the difference between a smooth, professional result and one streaked with dark crumbs.
The Role of Temperature
Room temperature butter is essential for smooth, spreadable buttercream. Cold butter creates lumpy, grainy frosting that tears the cake surface. Conversely, frosting that is too warm becomes soft and unworkable. The ideal working temperature for most frostings is cool room temperature — around 18–20°C (65–68°F). Chill assembled cakes between stages of decoration to keep everything firm and workable.
Precise Measurement in Baking
Cake baking is a precise science — small variations in ingredient quantities can meaningfully affect the texture, rise, and flavor of the finished cake. Our Complete Guide to Measuring Ingredients Accurately explains exactly how to measure dry and liquid ingredients correctly for consistently perfect results every time.
Organizing Your Workspace
Complex decorated cakes involve multiple components, stages, and tools. Having everything prepared, organized, and within reach before you begin each stage is the professional approach that makes the difference between a calm, controlled decorating session and a chaotic, stressful one. Our Mise en Place: How to Organize Your Cooking Like a Pro explains this essential principle in full.
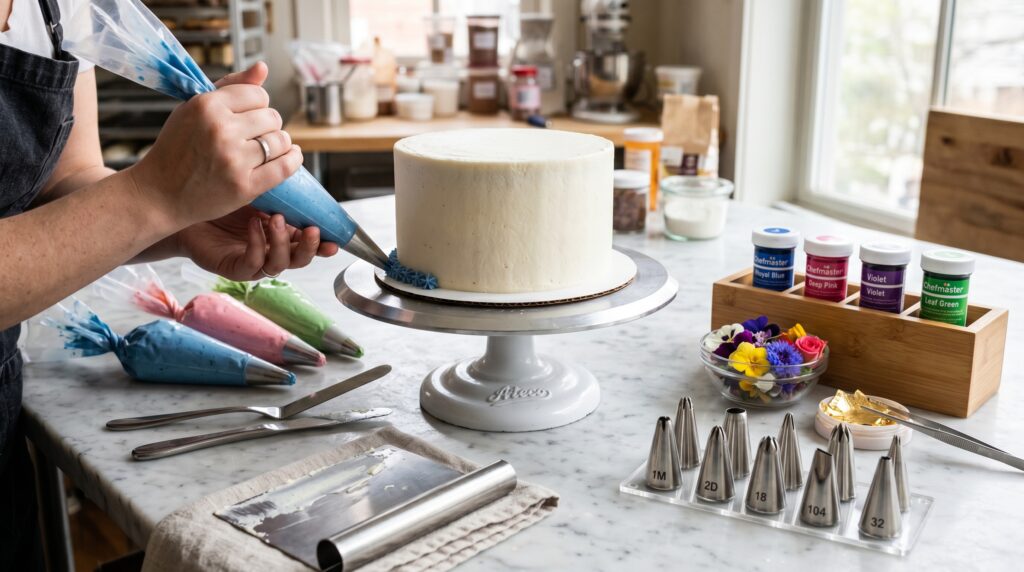
Essential Cake Decorating Tools
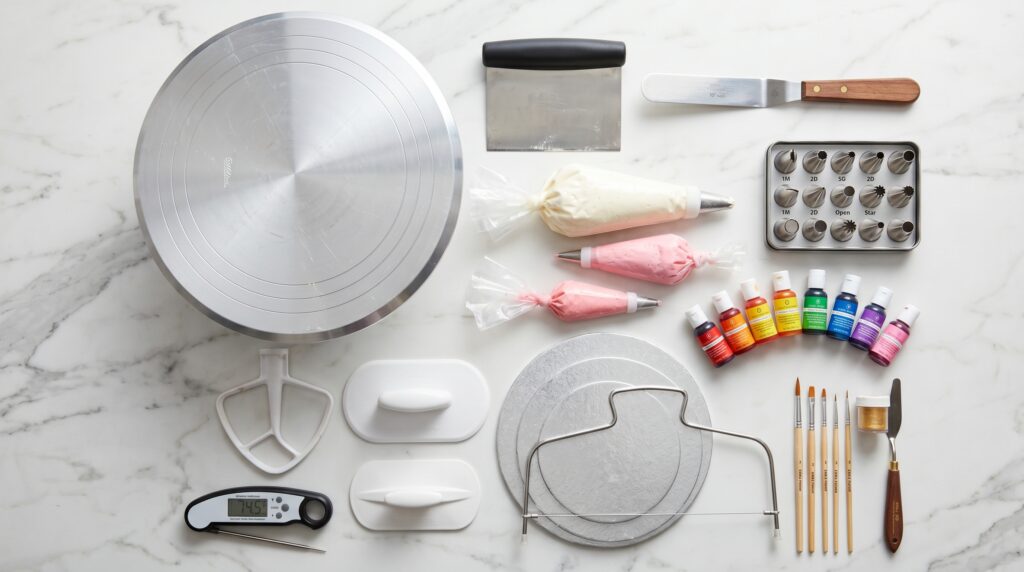
Investing in the right tools makes cake decorating dramatically more enjoyable and the results noticeably more professional. Here are the most important:
Rotating cake turntable — the single most important tool for smooth, even frosting application. A turntable allows you to spin the cake while holding the scraper or spatula steady, creating perfectly smooth sides with minimal effort.
Bench scraper (cake scraper) — for achieving smooth, sharp sides on buttercream cakes. Hold the scraper against the side of the cake while spinning the turntable for a clean, even finish.
Offset spatula — for spreading buttercream on cake layers and the top of the cake, and for detailed work and finishing touches.
Piping bags and nozzles — the large open star (1M), large closed star, round nozzle, petal nozzle, and leaf nozzle cover the majority of decorating applications.
Gel food coloring — always gel, never liquid. Gel provides intense, vibrant color without altering the consistency of buttercream or fondant.
Cake boards and drums — for stability and professional presentation. Always place your finished cake on a board that is at least 5cm wider than the cake.
Cake leveler or long serrated knife — for perfectly level layers.
Small paintbrushes — for applying edible paint, lustre dust, and food-safe gold leaf.
20 Decadent Cake Recipes and Decorating Ideas
Classic Cakes Reinvented
1. Triple Chocolate Drip Cake
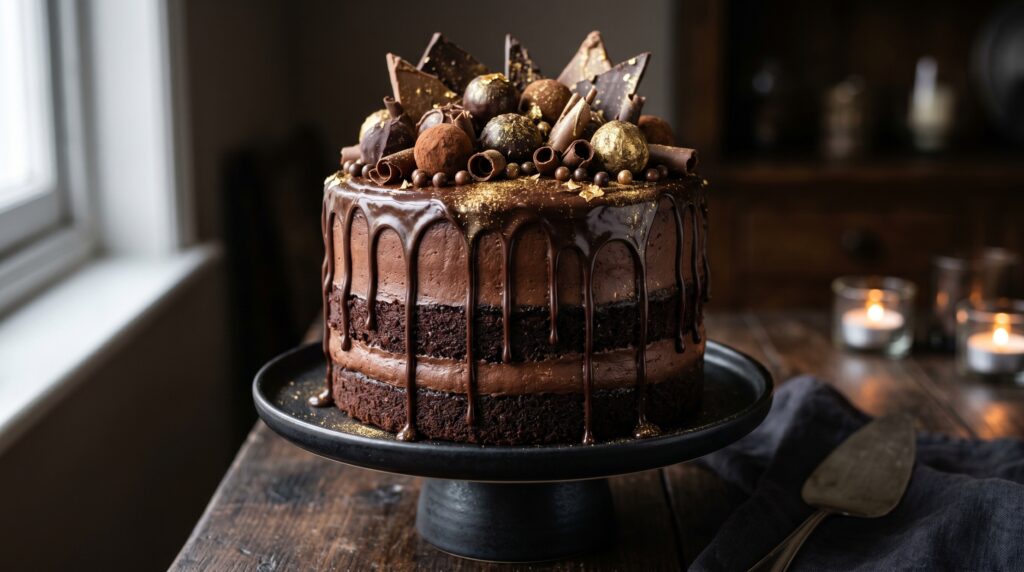
Cake: Triple chocolate layer cake Frosting: Dark chocolate ganache buttercream Decoration: Chocolate ganache drip, chocolate truffles, chocolate shards, edible gold dust Difficulty: Intermediate | Occasion: Birthday, celebration
The chocolate drip cake has become one of the defining cake decorating trends of the past decade — and done well, it is a genuinely spectacular creation. The key to a perfect drip is ganache at exactly the right temperature and consistency — warm enough to flow but cool enough to set before it runs too far.
Cake recipe: Combine plain flour, Dutch-process cocoa powder, caster sugar, baking powder, baking soda, and salt. Add eggs, whole milk, vegetable oil, hot coffee (which deepens the chocolate flavor dramatically), and vanilla extract. The coffee does not make the cake taste of coffee — it amplifies the chocolate flavor to an extraordinary degree.
Ganache drip technique: The ganache must be between 32–35°C (90–95°F) for the ideal drip consistency. Too hot and it runs all the way to the base; too cold and it refuses to flow properly. Test on the side of a chilled glass before applying to the cake. Apply drips around the edge using a piping bottle or spoon, varying the length deliberately for the most natural, beautiful result.
Pro tip: Chill the fully frosted and crumb-coated cake thoroughly before applying the drip — the cold surface causes the ganache to set faster, giving you more control over the drip length.
Understanding temperature is fundamental to chocolate work. Our Kitchen Temperatures: The Complete Guide from Simmer to Boil covers the precise temperatures relevant to ganache and chocolate preparation.
2. Classic Victoria Sponge with Swiss Meringue Buttercream
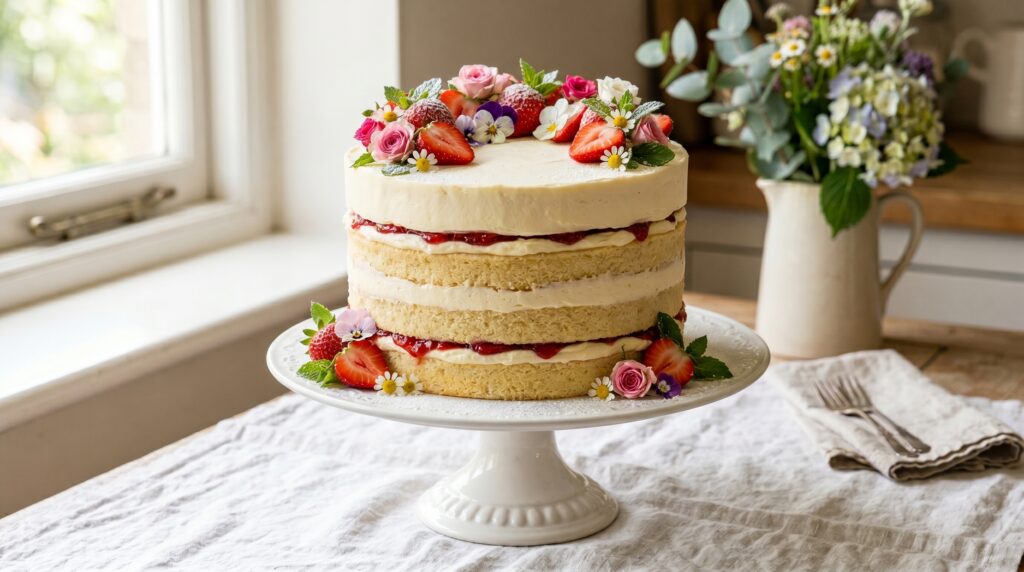
Cake: Classic Victoria sponge Frosting: Swiss meringue buttercream Decoration: Fresh strawberries, edible flowers, icing sugar dusting Difficulty: Intermediate | Occasion: Afternoon tea, birthday
The Victoria sponge is one of the great British baking classics — light, vanilla-scented, and perfect in its simplicity. Elevated with Swiss meringue buttercream (lighter, silkier, and less sweet than American buttercream) and dressed with fresh berries and edible flowers, it becomes something genuinely beautiful.
Swiss meringue buttercream: Combine egg whites and caster sugar in a heatproof bowl over simmering water, whisking constantly until the sugar dissolves completely and the mixture reaches 71°C (160°F). Remove from heat and beat to stiff, glossy peaks. Add softened butter gradually while beating until the buttercream is silky smooth. It will look curdled at one point — keep beating and it will come together.
Decorating technique: Frost the exterior smoothly using a bench scraper and turntable. Arrange halved fresh strawberries in a casual, generous cluster on the top of the cake. Tuck edible flowers and small herb sprigs between the strawberries for color and texture. Dust lightly with icing sugar immediately before serving.
Pro tip: Swiss meringue buttercream is significantly more heat-stable than American buttercream — making it ideal for summer celebrations and outdoor events.
3. Lemon and Elderflower Celebration Cake
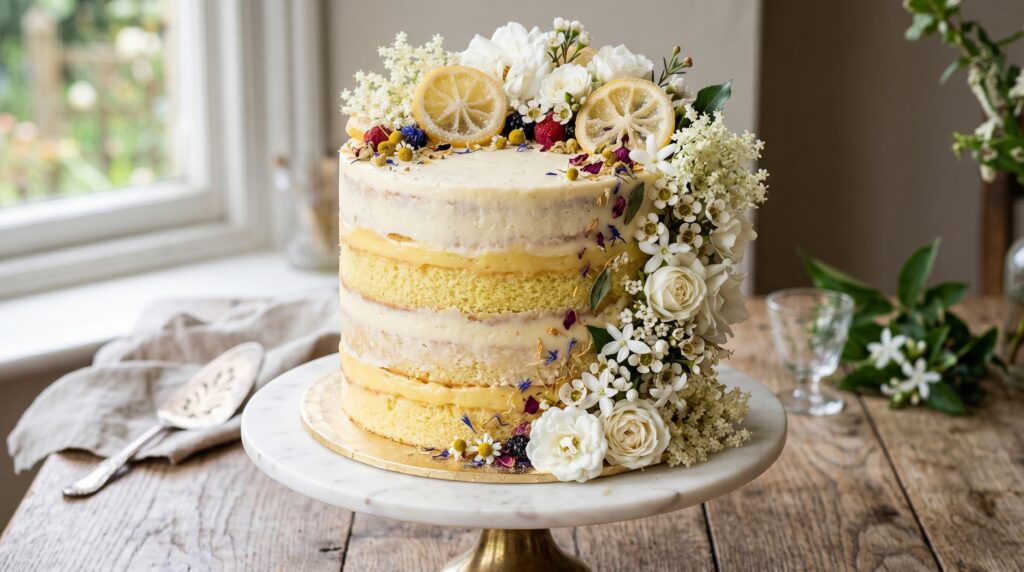
Cake: Lemon elderflower sponge Frosting: Elderflower buttercream with lemon curd filling Decoration: Semi-naked finish, crystallized lemon slices, edible flowers, fresh blossoms Difficulty: Intermediate | Occasion: Wedding, garden party, spring celebration
The lemon and elderflower combination became iconic following its appearance as a royal wedding cake flavor, and its extraordinary pairing of bright citrus and delicate floral sweetness fully justifies the celebration. The semi-naked finish — a thin, intentionally incomplete outer frosting layer that allows the cake layers to peek through — is one of the most beautiful and surprisingly achievable decorating styles.
Semi-naked technique: Apply a generous crumb coat, then use an offset spatula to spread the frosting in an irregular, slightly textured layer. Use the bench scraper to remove most of the frosting from the sides in a single smooth pass — leaving just enough to create a hazy, translucent effect through which the golden cake is visible. The imperfection is intentional and beautiful.
Crystallized lemon decoration: Simmer thin lemon slices in a sugar syrup (equal parts water and sugar) for 20 minutes. Drain and dry on a wire rack in a low oven for 2 hours until firm and slightly translucent. These keep for up to a week in an airtight container and make spectacular decorations.
4. Red Velvet Cake with Cream Cheese Frosting
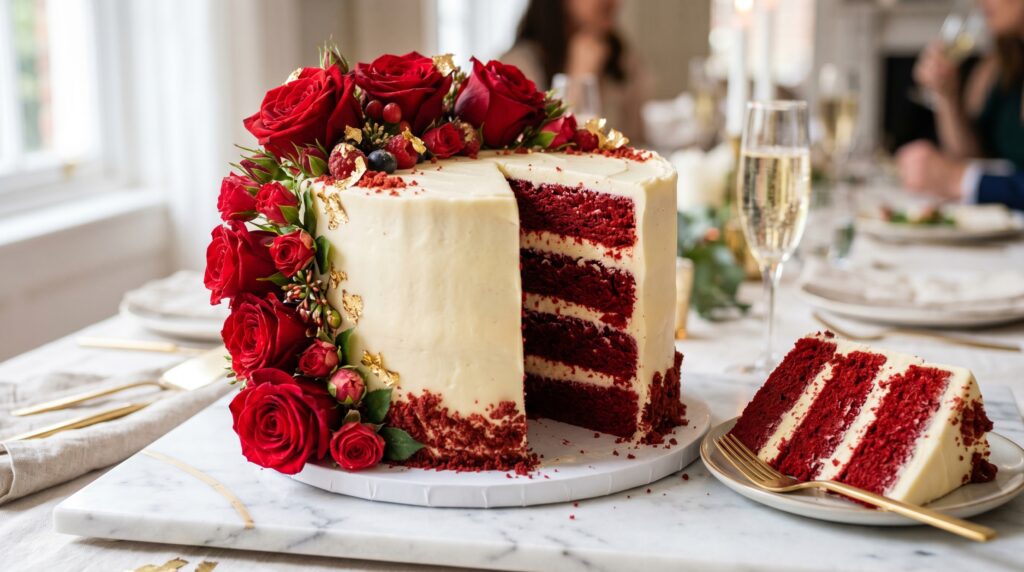
Cake: Classic red velvet sponge Frosting: Classic cream cheese frosting Decoration: Red velvet crumb finish, fresh red roses, gold leaf Difficulty: Intermediate | Occasion: Birthday, Valentine’s Day, celebration
Red velvet cake’s dramatic crimson interior and tangy cream cheese frosting make it one of the most visually striking and universally beloved celebration cakes. The reveal of those vivid layers when the cake is cut never fails to produce a reaction.
Key to authentic red velvet: The reaction between buttermilk, vinegar, and bicarbonate of soda is what gives red velvet its characteristic slight tang and tender crumb. Do not omit these ingredients. Use good quality red gel food coloring — a generous amount is needed for the signature vivid color.
Cream cheese frosting stability: Full-fat cream cheese at room temperature, beaten with softened butter before adding icing sugar, creates a frosting that is rich, tangy, and stable enough to pipe and spread cleanly. Never use low-fat cream cheese — it produces a runny, unstable frosting.
Red velvet crumb decoration: Reserve a small piece of the baked cake, crumble finely, and press gently around the base of the frosted cake for a stunning, textural finish that makes the cake’s interior instantly visible from the outside.
5. Carrot Cake with Walnut and Orange Cream Cheese Frosting
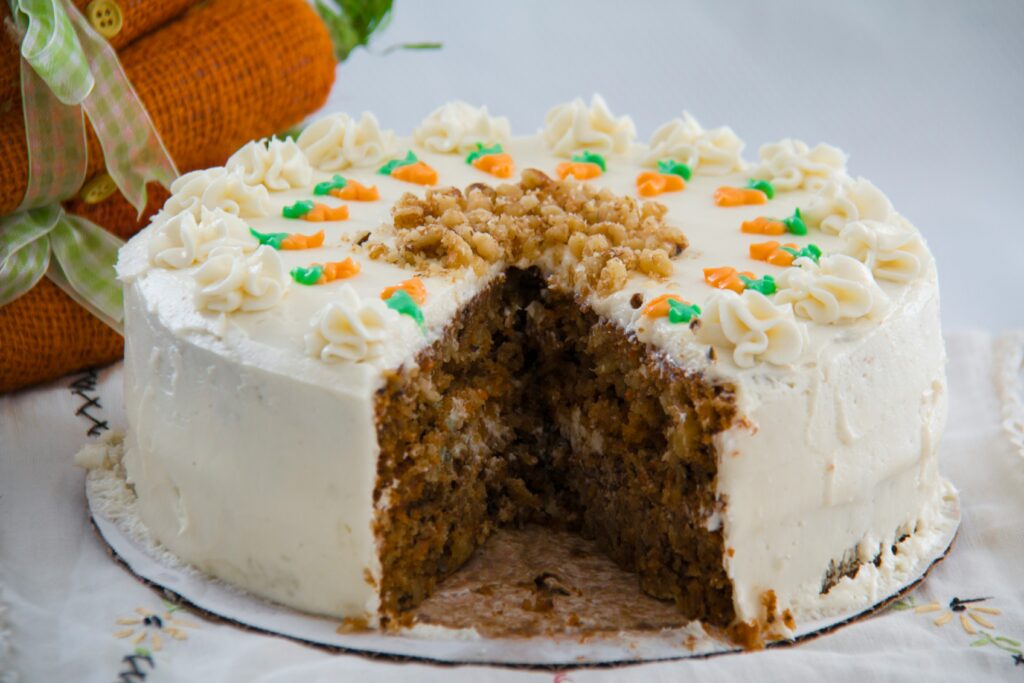
Cake: Classic spiced carrot cake with walnuts and raisins Frosting: Orange and walnut cream cheese frosting Decoration: Fondant carrot toppers, walnut border, cinnamon dusting Difficulty: Easy–Intermediate | Occasion: Birthday, Easter, autumn celebrations
Carrot cake is one of the most reliably delicious cakes in any baker’s repertoire — moist from the grated carrot and oil, warmly spiced with cinnamon, ginger, and nutmeg, and perfectly complemented by tangy cream cheese frosting with a bright note of orange zest.
Key to the moistest carrot cake: Use vegetable oil rather than butter — oil produces a significantly moister crumb that stays fresh for days. Squeeze excess moisture from the grated carrot before adding to the batter for a cake that rises evenly without sinking.
Fondant carrot toppers: Roll orange fondant into small cone shapes, texture with a toothpick to create a carrot surface pattern, and insert a small piece of green fondant or a real herb sprig at the top for the leaves. Allow to firm up overnight before placing on the finished cake.
Elegant and Floral Designs
6. Buttercream Floral Cascade Cake
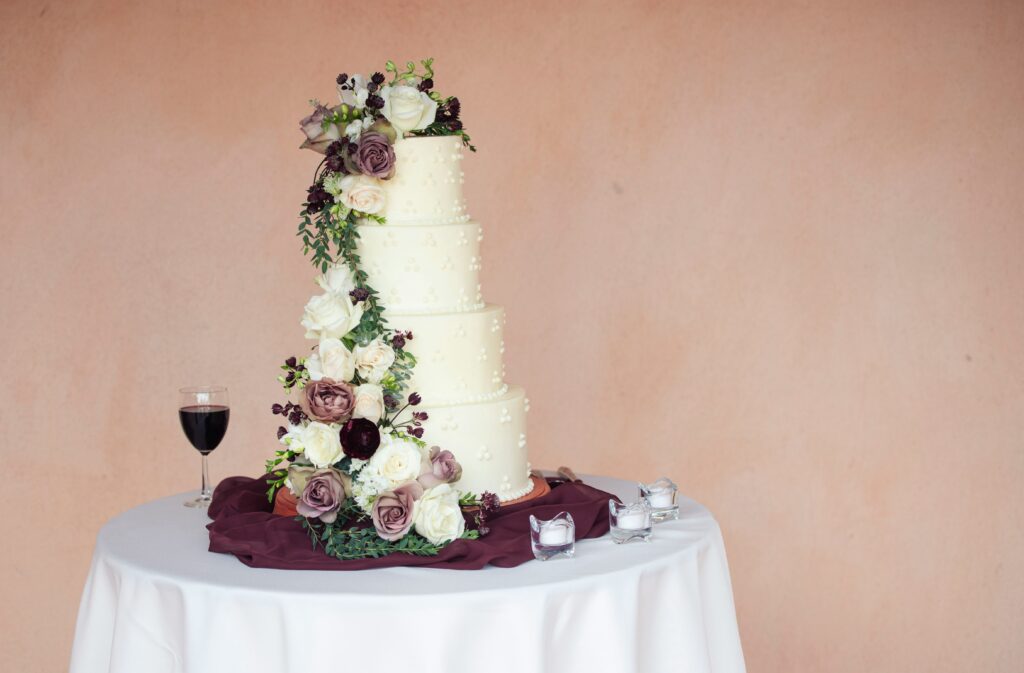
Cake: Vanilla or rose sponge Frosting: Smooth ivory Swiss meringue buttercream with multi-color floral piping Decoration: Hand-piped buttercream flowers in a cascading arrangement Difficulty: Advanced | Occasion: Wedding, milestone birthday, any elegant celebration
A buttercream floral cascade cake is the pinnacle of modern cake decoration — a symphony of individually hand-piped petals assembled into realistic blooms that cascade down the side of a perfectly smooth frosted cake in a diagonal river of color and texture. It is the decoration that most consistently stops people in their tracks.
Piping the flowers separately: Pipe each flower onto a small square of parchment paper on a flower nail, then freeze for 15 minutes until firm before transferring to the cake. This method allows you to create a large number of flowers in advance and arrange them on the cake without the time pressure of piping directly onto the cake surface.
Essential nozzles: Wilton 1M for large roses and peonies; Wilton 2D for open roses; Wilton 104 (petal nozzle) for individual rose petals and sweet peas; Wilton 81 for chrysanthemum and dahlia centers; leaf nozzle for foliage between blooms.
Arranging the cascade: Plan the arrangement before placing any flowers on the cake — sketch the diagonal path and identify where the largest blooms will anchor the design. Place the largest flowers first, then fill in with medium blooms, then small filler flowers and leaves in every gap. No background frosting should be visible in a full cascade.
Pro tip: The color palette makes or breaks a floral cake. Limit yourself to three to four coordinating shades plus green for foliage — restraint produces a more sophisticated result than a rainbow of unrelated colors.
7. Pressed Edible Flower Cake
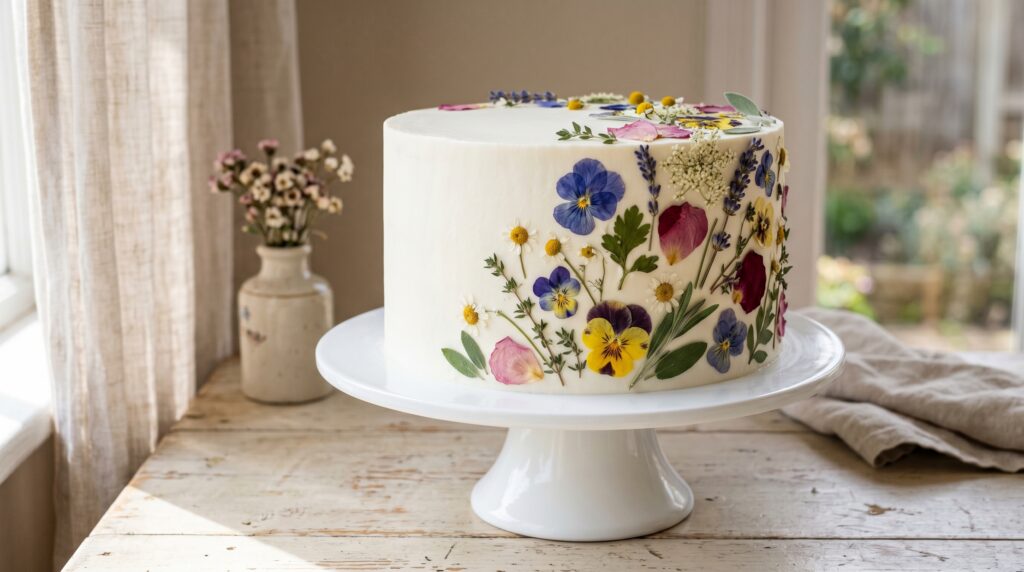
Cake: Vanilla or lavender sponge Frosting: White Swiss meringue buttercream Decoration: Pressed and dried edible flowers applied to smooth buttercream Difficulty: Intermediate | Occasion: Wedding, bridal shower, garden party
The pressed edible flower cake has a quietly stunning, botanical gallery quality — real dried flowers applied to smooth white buttercream in an arrangement that is simultaneously natural and intentional. The simplicity of the technique belies the extraordinary visual impact of the result.
Edible flowers for pressing: Violas, pansies, lavender, chamomile, rose petals, borage, nasturtiums, and herb flowers (chive blossoms, thyme flowers, rosemary flowers) all press beautifully. Ensure all flowers are food-safe, unsprayed, and sourced from a reputable edible flower supplier.
Pressing the flowers: Press flowers between sheets of parchment paper inside a heavy book for a minimum of 48 hours until completely flat and dry. The flatter the flower, the more cleanly it adheres to the frosting.
Application technique: Chill the frosted cake until the buttercream is firm. Use a clean, dry paintbrush or tweezers to place each pressed flower onto the frosting surface, pressing very gently to adhere. Arrange in an organic, flowing pattern rather than a rigid, symmetrical one.
Pro tip: Apply the pressed flowers no more than 2–3 hours before serving — over time, moisture from the frosting can cause the petals to lose their color and begin to wilt.
8. Watercolor Buttercream Cake
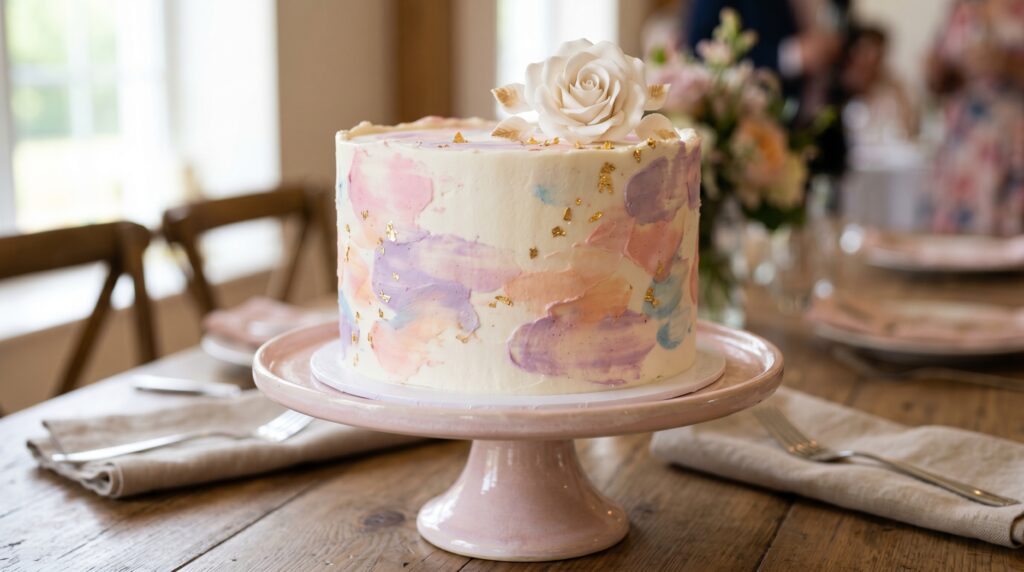
Cake: Vanilla or almond sponge Frosting: White American or Swiss meringue buttercream base with gel color palette Decoration: Watercolor palette knife painting technique, gold leaf, sugar rose Difficulty: Intermediate | Occasion: Birthday, wedding, bridal shower
The watercolor cake technique produces results of extraordinary painterly beauty — soft, blended washes of color applied directly to a smooth white buttercream surface with a small palette knife, creating the impression of a delicate watercolor painting wrapped around a cake.
The watercolor technique: Prepare small amounts of buttercream in four to five colors — soft, pastel shades work most beautifully. Chill the smoothly frosted white base cake until firm. Apply small daubs of colored buttercream to the surface using the tip of a small palette knife. Blend the edges of each color into the white base with broad, loose strokes — working quickly before the buttercream sets. Overlap colors slightly where they meet for natural, organic blending.
Color selection: The most beautiful watercolor cakes use analogous color palettes — colors that sit adjacent to each other on the color wheel. Blush pink, coral, peach, and gold; lavender, lilac, soft pink, and silver; sage green, mint, cream, and gold are all stunning combinations.
Gold leaf application: After the watercolor layer has chilled and set, apply small, irregular pieces of edible gold leaf using a dry brush, pressing gently onto the buttercream surface. The organic, irregular gold patches enhance the painterly quality of the design.
9. Geode Crystal Cake
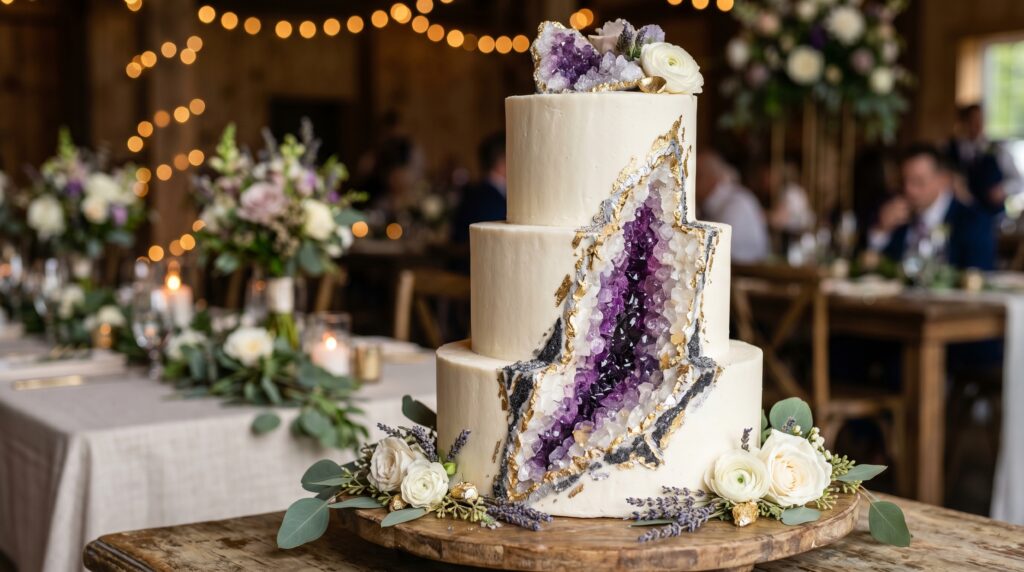
Cake: Dark chocolate or vanilla sponge Frosting: Deep teal or navy buttercream exterior Decoration: Carved geode hollow filled with rock candy crystals, edible gold paint Difficulty: Advanced | Occasion: Birthday, geologically themed celebration
Geode cakes are one of the most dramatic and technically impressive cake decorating achievements — a hollow carved into the side of a frosted cake and filled with edible rock candy crystals that catch the light like a genuine gemstone cross-section. The contrast between the dark, smooth exterior and the glittering, crystalline interior is visually extraordinary.
Creating the geode: After assembling and frosting the cake layers, carve an organic, irregular hollow into one side using a spoon or melon baller. Pipe a thick border of stiff buttercream around the hollow opening. Fill the hollow with rock candy in two or three complementary jewel tones — amethyst purple and rose quartz pink are particularly spectacular. Apply edible gold lustre paint mixed with a little food-safe alcohol along the edges of the hollow where the crystals meet the frosting.
Rock candy: Available in cake decorating stores and online, or can be made at home by growing sugar crystals on wooden skewers in a concentrated sugar solution over several days.
Pro tip: Press the rock candy firmly into a thin layer of piped royal icing inside the hollow to anchor it in place — loose crystals will shift and fall during transport.
10. Mirror Glaze Cake
Cake: Mousse cake or chilled entremet Frosting: Mirror glaze (glacage miroir) Decoration: Marbled color effect in the glaze itself Difficulty: Advanced | Occasion: Special celebration, showstopper occasion
Mirror glaze is one of the most technically spectacular cake finishing techniques in existence — a glossy, perfectly smooth glaze made from sugar, condensed milk, white chocolate, and gelatin that sets to a flawless, reflective surface that literally mirrors its surroundings like liquid glass. The marbled color effect is created by swirling multiple colored glazes together as they are poured.
Mirror glaze recipe: Combine water, sugar, and glucose syrup and bring to 103°C (217°F). Pour over white chocolate and condensed milk, add bloomed gelatin, and blend until completely smooth. Strain through a fine sieve. Divide into portions and add gel food coloring to each. Cool to exactly 32–35°C (90–95°F) before pouring.
The pouring technique: The cake (usually a mousse-based entremet) must be frozen solid before glazing — the cold surface causes the glaze to set almost instantly, capturing the marbled pattern. Place the cake on a wire rack over a tray. Pour the glazes simultaneously from the center outward, allowing them to flow over the surface naturally. Do not touch or smooth the glaze — the flow of gravity creates the perfect surface.
Critical temperature: The glaze must be at exactly 32–35°C when poured. Too warm and it runs off without coating; too cold and it sets before covering evenly. A kitchen thermometer is non-negotiable for this technique.
Showstopper and Celebration Cakes
11. Fault Line Cake
Cake: Vanilla or strawberry layer cake Frosting: Pastel buttercream in two coordinating shades Decoration: Fault line effect revealing sprinkles, dried flowers, or edible decorations Difficulty: Intermediate | Occasion: Birthday, celebration
The fault line cake is one of the cleverest and most visually exciting contemporary cake decorating trends — a perfectly smooth exterior that appears to have cracked apart horizontally, revealing a hidden interior of colorful decorations bursting through the gap. The reveal is dramatic, unexpected, and consistently delights guests.
Creating the fault line: Frost the assembled cake layers in a crumb coat and chill. Apply a thin band of frosting around the equator of the cake and press your chosen decorations — sprinkles, dried flowers, gold leaf, crushed candy — into this band. Apply a thick layer of frosting above and below the decoration band, deliberately leaving the decorated band exposed. Use the bench scraper to smooth the upper and lower sections cleanly, allowing the decoration band to remain visible as the “fault.”
Filling ideas: Rainbow sprinkles for a fun birthday cake; dried rose petals and gold leaf for an elegant celebration; crushed edible gems for a geode effect; freeze-dried fruit pieces for a fresh, colorful fill.
12. Number Cake
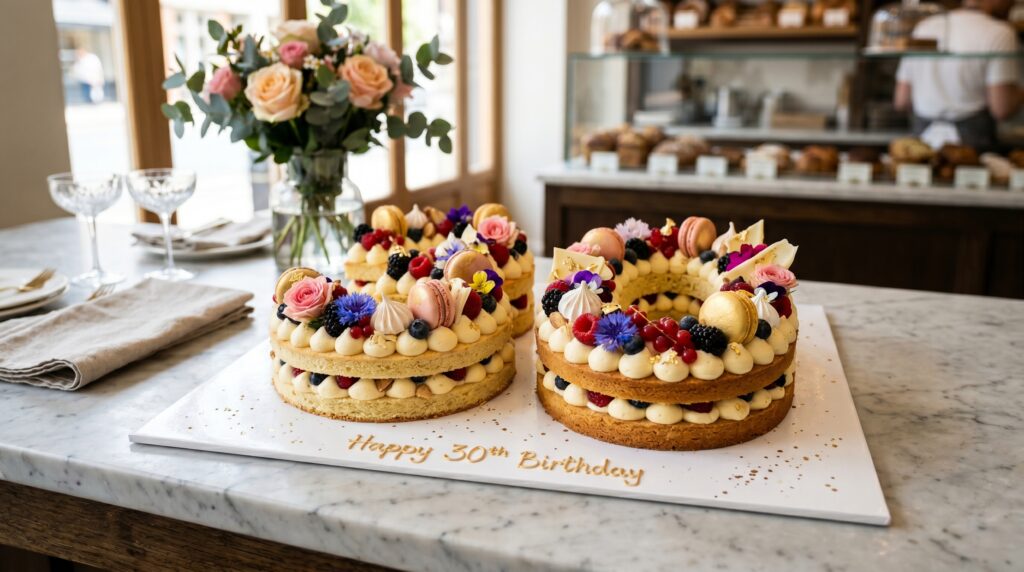
Cake: Almond sablé or sponge base Frosting: Diplomat cream, chantilly cream, or buttercream Decoration: Fresh fruit, macarons, edible flowers, meringue kisses, gold leaf Difficulty: Intermediate | Occasion: Milestone birthday, anniversary
Number cakes have become one of the most fashionable and personalized celebration cake formats — flat numeral shapes cut from sponge or pastry, layered with cream, and abundantly decorated with an abundance of toppings that transform the number into a lavish, garden-like installation.
The base options: Almond sablé pastry produces a crisp, buttery base with excellent structural integrity. Vanilla sponge works for a softer, more traditional cake texture. Cut the numerals using a paper template — print your chosen numbers in the largest size that fits your baking tray, cut out, and use as a cutting guide.
Decoration philosophy: Abundance is everything with number cakes. Every centimeter of the surface should be covered — this is not a minimalist design. Alternate heights (whole strawberries, halved figs, small macaron towers) create visual interest and depth.
13. Ombre Layer Cake
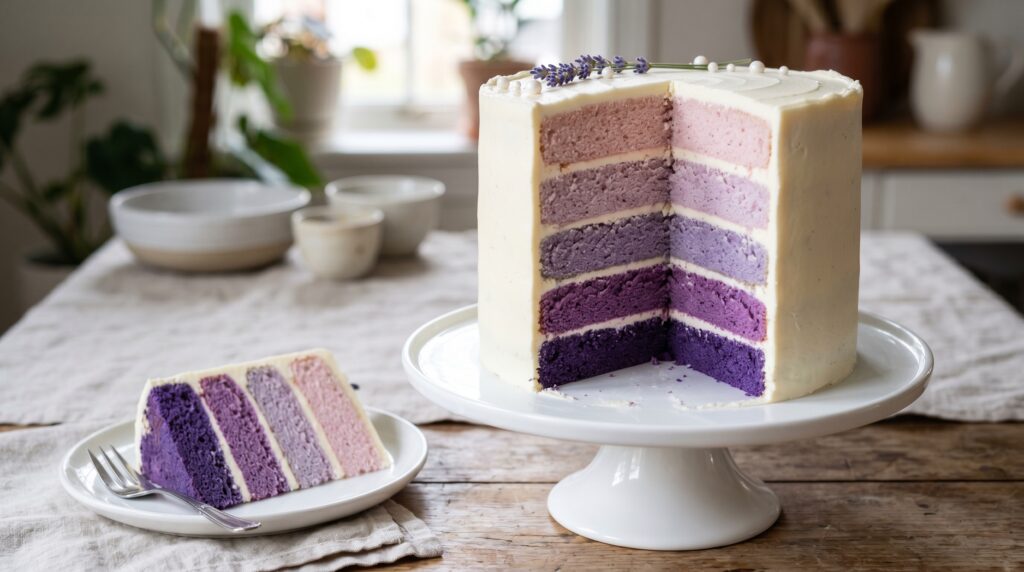
Cake: Vanilla sponge layers in five graduated colors Frosting: White Swiss meringue buttercream exterior Decoration: Color gradient visible in cross-section, simple smooth exterior Difficulty: Intermediate | Occasion: Birthday, celebration
The ombre layer cake delivers its drama not in its exterior decoration but in the stunning reveal of its interior — five or six graduated layers of the same color progressing from deep to light create a breathtaking cross-section that stops every guest when the first slice is cut.
Creating the gradient: Divide your vanilla sponge batter equally between five or six bowls. Color each portion progressively — start with the deepest shade in the first bowl, add progressively more white batter (or less coloring) to each subsequent bowl to create the gradient. Bake each layer separately.
The assembly: Stack the layers from darkest at the bottom to lightest at the top. The white exterior keeps the interior colors as a surprise reveal until the first slice is cut.
Color palette ideas: Purple to pink to blush to cream; teal to turquoise to mint to white; navy to cobalt to sky blue to pale blue; coral to peach to yellow to cream.
14. Drip Cake with Fresh Berries and Edible Gold
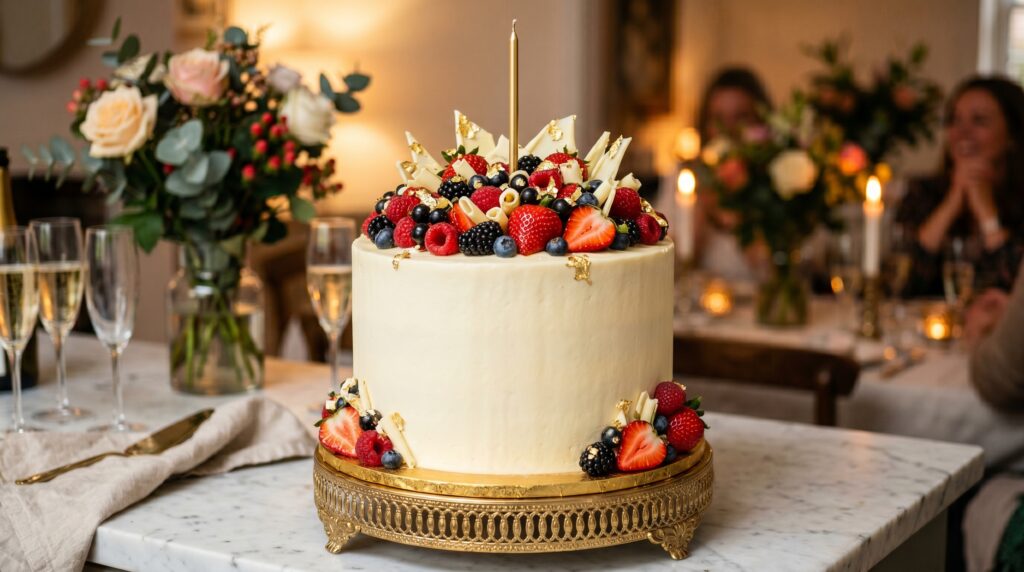
Cake: Vanilla layer cake Frosting: Smooth ivory buttercream with white chocolate ganache drip Decoration: Fresh mixed berries, edible gold leaf, white chocolate shards Difficulty: Intermediate | Occasion: Birthday, summer celebration
The fresh berry drip cake is one of the most timelessly beautiful celebration cake designs — the jewel-bright colors of mixed fresh berries against smooth ivory frosting and a glossy white chocolate ganache drip create a combination of natural beauty and decorating craft that never goes out of style.
White chocolate ganache drip: Melt good quality white chocolate with warm double cream (2:1 chocolate to cream ratio). Stir until smooth, add a very small amount of gel food coloring if desired (pale pink or gold), and allow to cool to 30–32°C before applying. White chocolate drips are more delicate and temperamental than dark — test consistently on a chilled glass before applying to the cake.
Berry arrangement: Pile berries generously on top of the dripped cake, varying the height and grouping similar colors together in clusters. Tuck small edible flowers and herb sprigs between the berries for color and texture. Apply gold leaf pieces with a dry brush in the spaces between the berries.
15. Fondant Sculpted Celebration Cake
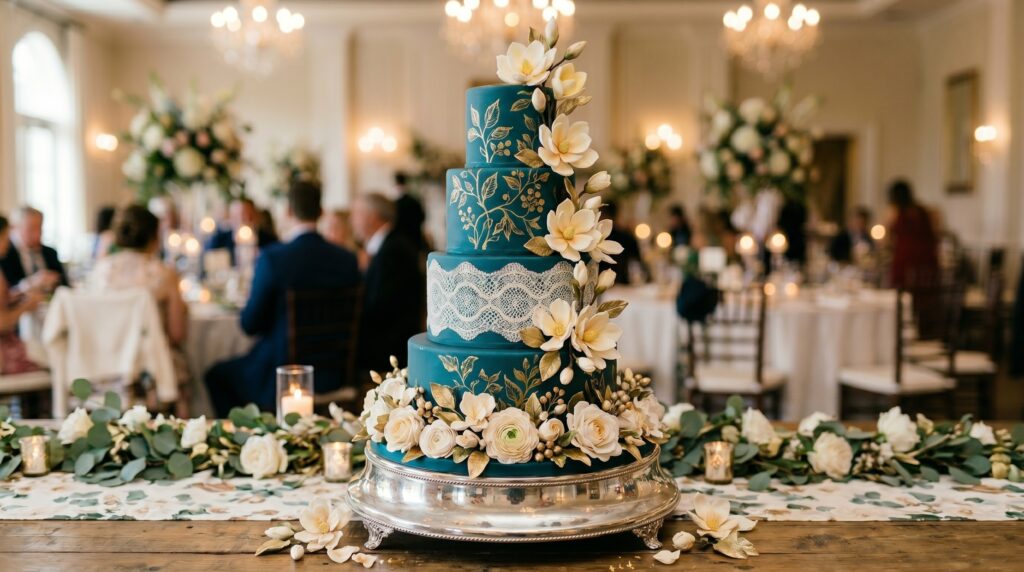
Cake: Any firm layer cake (chocolate, vanilla, or fruit cake) Frosting: Smooth fondant over buttercream base Decoration: Hand-painted fondant, sculpted sugar flowers, sugar lace Difficulty: Advanced | Occasion: Wedding, milestone celebration
Fondant-covered cakes represent the most formal and technically demanding tradition in cake decoration — the perfectly smooth, porcelain-like fondant surface providing a canvas for hand painting, sculpted sugar flowers, and the finest sugar craft work.
Covering with fondant: Knead the fondant until warm and pliable. Roll to an even thickness of approximately 4–5mm. Lift carefully over the rolling pin and drape over the buttercream-coated cake. Smooth the top first with a fondant smoother, then work down the sides, easing the fondant around the curve without tearing. Trim the excess at the base.
Hand painting on fondant: Mix gel food coloring with a small amount of food-safe clear alcohol (or lemon extract) to create edible paint of the right consistency. Use fine food-safe paintbrushes to paint botanical illustrations, geometric patterns, or abstract designs directly onto the dry fondant surface.
Sugar flowers: Gum paste (a firmer, faster-drying version of fondant) is the medium for sculpted sugar flowers. Individual petals cut with petal cutters, thinned at the edges with a ball tool, shaped over formers, and dried before assembly create flowers of breathtaking realism.
Creative and Contemporary Designs
16. Naked Cake with Seasonal Flowers and Fruit
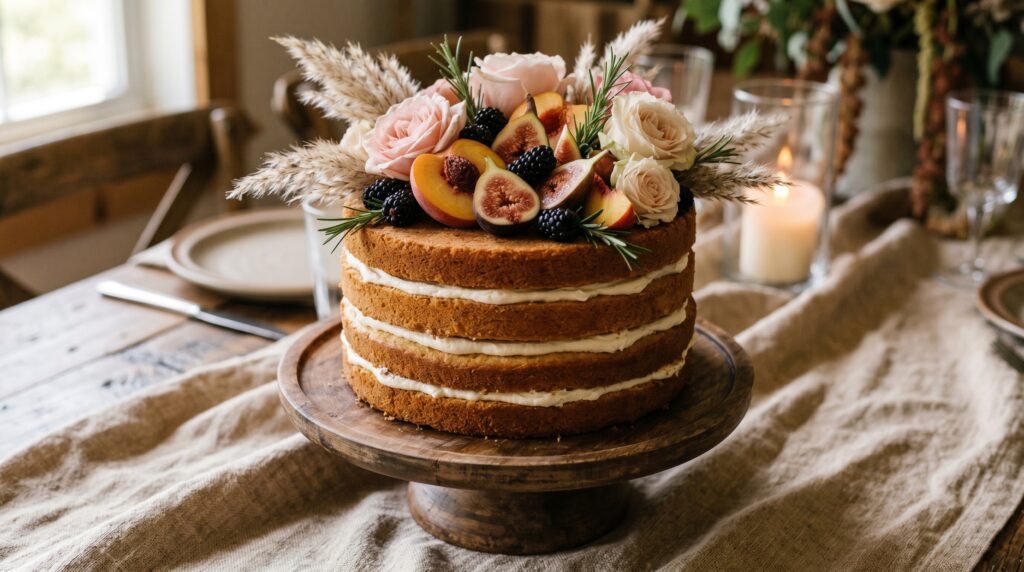
Cake: Vanilla or almond sponge Frosting: Chantilly cream or lightly sweetened mascarpone between layers only Decoration: Seasonal fresh fruit, fresh flowers, herbs, and natural elements Difficulty: Easy | Occasion: Wedding, outdoor celebration, rustic gathering
The naked cake is the anti-frosting statement — layers of sponge with cream filling visible on all sides, the top dressed with seasonal fruit, flowers, and natural elements in an arrangement that celebrates organic beauty over technical perfection. It is simultaneously the most approachable decorated cake for beginners and one of the most naturally beautiful for any occasion.
The key to a beautiful naked cake: The cake layers and filling must be genuinely delicious, since there is nothing to hide behind. Use the best quality vanilla extract, real cream, and seasonal fruit. The arrangement on top should look abundant and slightly wild rather than rigidly symmetrical.
Seasonal decoration ideas: Spring — cherry blossoms, strawberries, and fresh mint. Summer — peaches, figs, raspberries, and garden roses. Autumn — figs, blackberries, pears, rosemary, and dried flowers. Winter — pomegranate seeds, orange slices, cranberries, and evergreen sprigs.
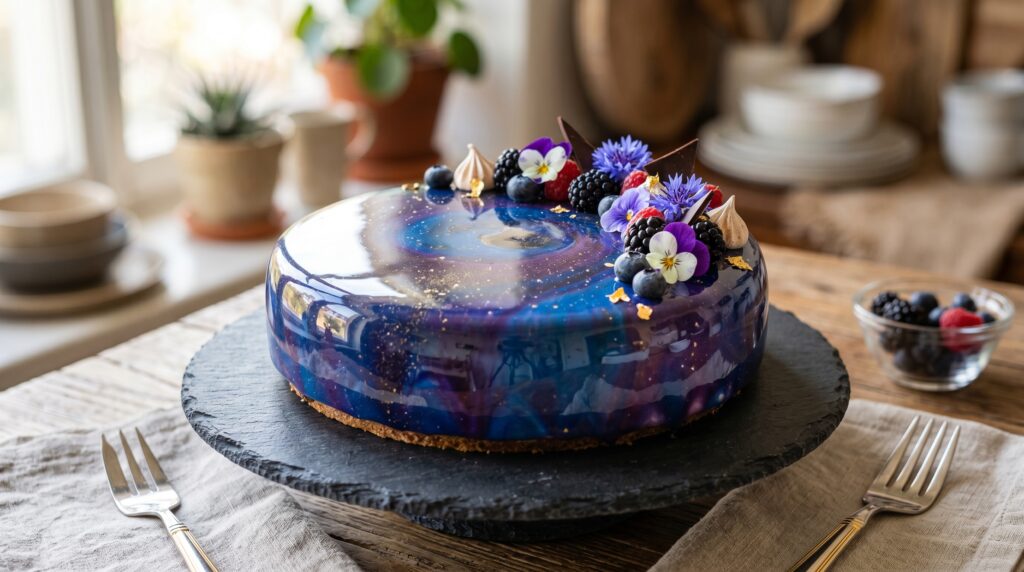
17. Galaxy Mirror Glaze Cake
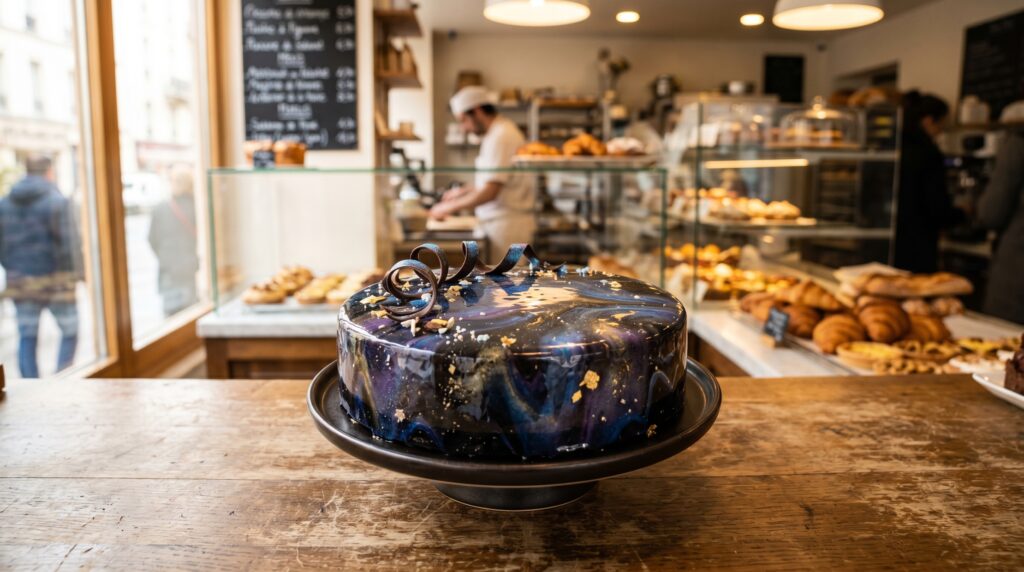
Cake: Chocolate mousse entremet Frosting: Galaxy-effect mirror glaze in navy, purple, and black with silver streaks Decoration: Edible glitter stars, silver edible paint constellation Difficulty: Advanced | Occasion: Special birthday, space-themed celebration
Galaxy cakes represent the most dramatic application of mirror glaze technique — the deep, swirling universe of color created by combining midnight navy, deep purple, black, and silver glazes creates a cake that looks literally out of this world.
Creating the galaxy effect: Prepare four separate batches of mirror glaze in midnight navy, deep purple, black, and silver (achieved with silver edible lustre powder stirred into a clear glaze base). All must be at exactly the same temperature (32–35°C) before pouring. Pour all four colors simultaneously from the center of the frozen cake outward. Use a toothpick to draw gentle swirling strokes through the fresh glaze — do not over-mix or the colors will muddy. Immediately scatter fine edible glitter across the surface while the glaze is still wet.
18. Textured Petal Cake
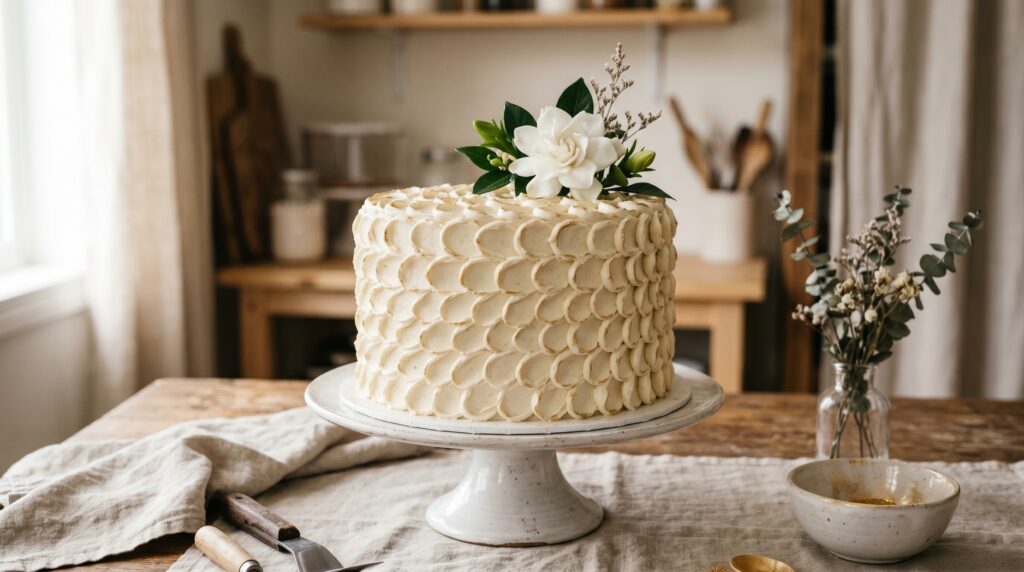
Cake: Vanilla or champagne sponge Frosting: Ivory or pale pink American buttercream Decoration: Spoon petal texture, gold lustre tips, single fresh flower Difficulty: Intermediate | Occasion: Wedding, bridal shower, elegant birthday
The petal texture technique creates a beautifully tactile, three-dimensional surface effect using nothing more than the back of a small spoon — yet the result has an elegance and sophistication that looks far more technically demanding than it actually is.
The petal technique: Starting at the base of the frosted cake, press the back of a small round spoon into the buttercream and pull it upward and to the right in a single curved stroke, creating a concave petal shape. Begin the next petal overlapping the right edge of the first. Work in rows from the base upward, keeping the petal shapes consistent in size and direction.
Finishing touches: Use a dry soft brush to dust the tips of the petals with gold or pearl edible lustre powder — this catches the light and adds a beautiful dimensional quality to the texture.
19. Concrete Effect Cake with Gold Accents
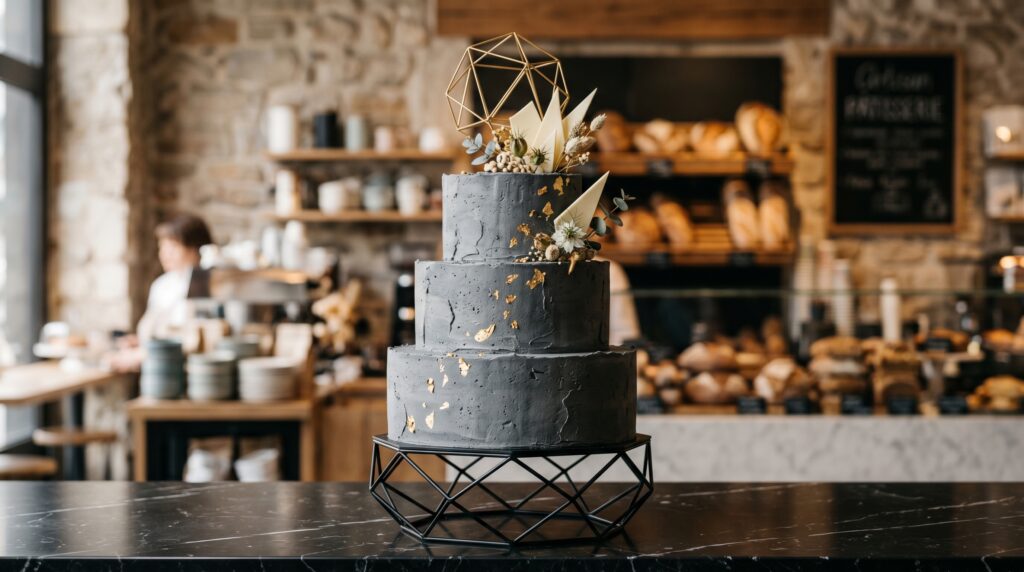
Cake: Dark chocolate or vanilla layer cake Frosting: Grey-tinted American buttercream with matte finish Decoration: Intentionally imperfect smooth finish, edible gold leaf, geometric gold accents Difficulty: Intermediate | Occasion: Modern birthday, architecture-themed celebration, corporate event
The concrete effect cake is a bold, contemporary design that appeals to those who find conventional cake decoration too sweet or fussy. The deliberately imperfect, slightly rough grey buttercream surface mimics the texture of poured concrete, and the minimal gold accents create a brutalist-meets-luxury aesthetic that is genuinely striking.
Creating the concrete texture: Tint a batch of smooth American buttercream with black and grey gel food coloring until a medium concrete grey is achieved. Apply over the crumb-coated cake and use a bench scraper to smooth — but deliberately leave some slight imperfections and texture rather than achieving a perfectly flawless finish. The slightly rough, imperfect quality is the entire aesthetic.
Gold leaf application: Apply irregular, torn pieces of edible gold leaf to create patches of warmth against the cool grey surface. The contrast between matte grey and brilliant gold is what makes this design so visually striking.
20. Piñata Surprise Cake
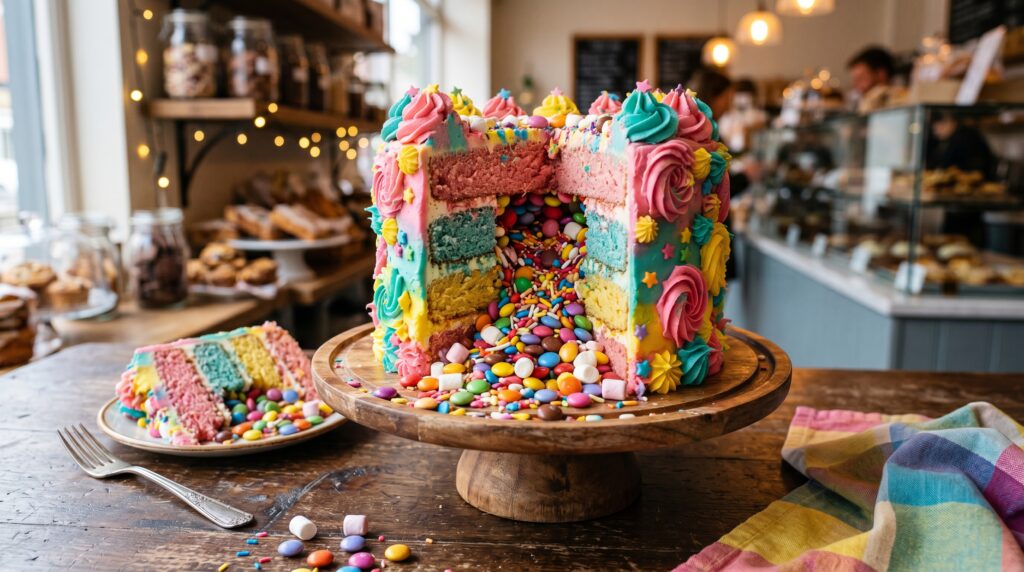
Cake: Vanilla or funfetti layer cake Frosting: Multi-color buttercream swirl exterior Decoration: Hidden candy interior, rainbow buttercream, star sprinkles Difficulty: Intermediate | Occasion: Birthday, children’s party, any celebration
The piñata cake is pure celebration engineering — a beautifully decorated exterior concealing a hollow center packed with sweets and sprinkles that cascade dramatically when the first slice is cut. The moment of the reveal — the avalanche of candy pouring from the cake’s center — is one of the most joyful moments in all of celebration baking.
Creating the hollow center: Use a round cookie cutter to cut a circular hole from the center of each middle layer before assembly. When the layers are stacked, the cut-out sections align to create a hollow column in the center of the cake. After frosting and before the final top layer is added, fill the hollow generously with mixed sweets, sprinkles, and mini candies. Place the final top layer over the filled hollow and frost the entire exterior.
The reveal: Cut straight down through the center of the cake with one confident cut — the candy filling will cascade dramatically from the interior as the slice falls away. Position guests nearby for maximum effect.
Pro tip: Do not refrigerate the filled cake for too long before serving — condensation inside the hollow can cause some sweets to become sticky or melt slightly. Fill and frost on the day of serving for the best reveal.
For more inspiration on baking treats that complement your celebration cakes, our Homemade Cookies: 10 Easy Recipes offers a wonderful collection of crowd-pleasing baked treats perfect for any party spread.
Frosting and Filling Reference Guide
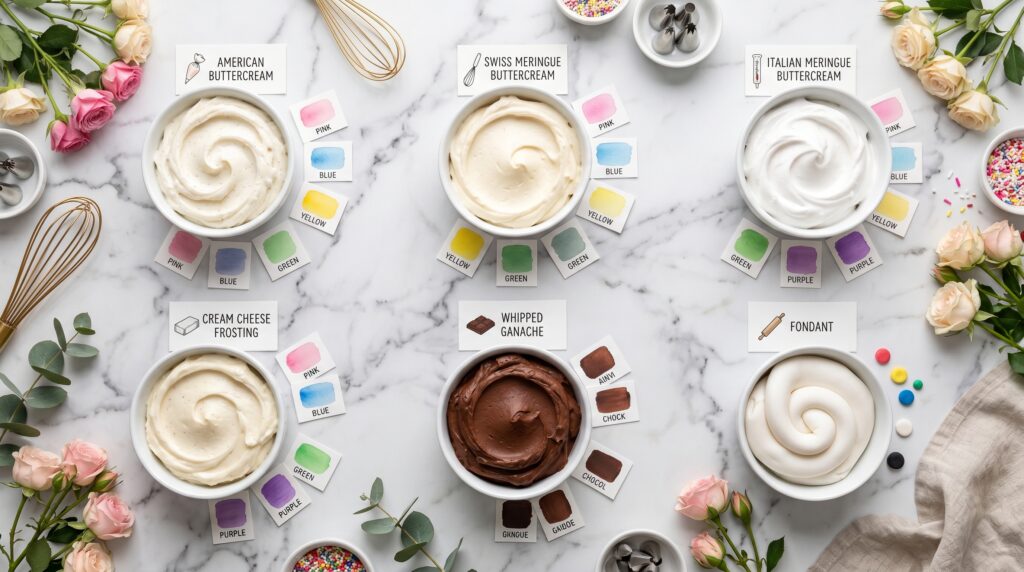
Understanding the properties of different frostings helps you choose the right one for each cake and occasion:
| Frosting Type | Texture | Sweetness | Heat Stability | Best For |
|---|---|---|---|---|
| American Buttercream | Rich, dense | Very sweet | Low | Quick everyday cakes, piping |
| Swiss Meringue Buttercream | Light, silky | Moderately sweet | Medium-high | Elegant cakes, hot weather |
| Italian Meringue Buttercream | Extremely light | Lightly sweet | High | Wedding cakes, summer events |
| Cream Cheese Frosting | Tangy, rich | Moderately sweet | Low | Red velvet, carrot cake |
| Whipped Ganache | Rich, glossy | Depends on chocolate | Medium | Chocolate cakes, drip cakes |
| Fondant | Smooth, firm | Very sweet | High | Formal cakes, sculpted work |
Cake Decorating Techniques: Difficulty Guide
| Technique | Difficulty | Key Tool | Time Required |
|---|---|---|---|
| Smooth buttercream finish | Beginner | Bench scraper + turntable | 30 minutes |
| Semi-naked finish | Beginner | Offset spatula | 20 minutes |
| Sprinkle and fresh fruit | Beginner | None | 15 minutes |
| Drip technique | Intermediate | Piping bottle or spoon | 30 minutes |
| Watercolor technique | Intermediate | Small palette knife | 45 minutes |
| Fault line | Intermediate | Bench scraper | 45 minutes |
| Petal texture | Intermediate | Round spoon | 1 hour |
| Ombre layers | Intermediate | Multiple tins | 2 hours |
| Buttercream flowers | Advanced | Petal nozzle + flower nail | 2–3 hours |
| Mirror glaze | Advanced | Thermometer + wire rack | 2 hours |
| Fondant sculpted | Advanced | Fondant tools | 4+ hours |
| Geode crystals | Advanced | Rock candy + piping bag | 3 hours |
Food Safety and Storage for Decorated Cakes
A beautifully decorated cake deserves proper storage to maintain both its appearance and its safety. Here are the key guidelines:
Buttercream-frosted cakes can be stored at cool room temperature (below 20°C) for up to 2 days, or refrigerated for up to 5 days. Bring to room temperature for 1–2 hours before serving — cold buttercream loses its soft, yielding texture.
Cream cheese-frosted cakes must always be refrigerated and consumed within 3–4 days due to the dairy content.
Fresh fruit-decorated cakes should be refrigerated and consumed on the same day or the following day for best appearance and food safety.
Fondant-covered cakes should be stored at cool room temperature rather than refrigerated, as condensation can form on the fondant surface when moving from cold to warm environments, causing the fondant to become sticky and the colors to run.
For comprehensive food safety guidance covering all decorated cake preparations, our Food Safety 101: Storage, Handling, and Temperature Guide is essential reading for any serious home baker.
According to the American Bakers Association, the hallmark of a truly skilled cake decorator is not simply technical mastery but the ability to match the right decoration style and technique to the occasion, the recipient, and the flavor of the cake — ensuring that beauty and deliciousness work in perfect harmony rather than in competition.
Conclusion
From the dramatic cascade of hand-piped buttercream flowers to the liquid-glass perfection of a mirror glaze, from the joyful surprise of a piñata cake to the serene botanical beauty of a pressed flower design — these 20 decadent cake recipes and cake decorating ideas represent the full, extraordinary range of what is possible in the home baker’s kitchen.
What makes a truly great decorated cake is not simply technical skill — though skill matters greatly — but the combination of a genuinely delicious recipe, a decoration that suits the occasion and the person being celebrated, and the care and intention that goes into every stage of preparation. Guests taste all of these things in every bite, even if they cannot articulate precisely what they are tasting.
Start with the techniques that match your current skill level — the semi-naked cake, the drip cake, the ombre layers — and build your confidence and repertoire from there. Each technique mastered opens the door to the next, and the progress a dedicated home baker can make in a single year of purposeful practice is genuinely remarkable.
Most importantly: bake with joy. The most beautiful cakes in the world are made by people who love what they are doing, and that love is always visible in the finished result.
For more baking recipes, decorating inspiration, and cooking guidance across every skill level, explore our full collection at skillsinthekitchen.com.